
| section: < previous | next > | | | |
chapter: << previous | next >> |
4.5 Predicate Container
The predicate container provides the possibility to form expressions with existance and for-all quantification, and therefor it is connected with a collection classifier, on which the expression is made. As it is a container, other expressions, like navigation or boolean expressions, can be placed inside. As we will see, this construct is the most complex one implemented in this editor.
a) Creating a Predicate Container
- Select the Predicate Container-Button from among the Container items. Then click inside the constraint-figure, whereupon a dialog appears (see fig. 4.5.1).
- This dialog is used to specify a predicate container and the corresponding collection classifier, which cannot be changed after creation. First of all, select, if an exists or a for-all container should be created by choosing an entry from the first drop down list.
- The next two fields define the collection classifier, first the variable name, which may be an empty string, and then the type. In this example, the collection classifier is unnamed and of type Employee.
- To make statements on the elements inside the collection, we have to refer to them. Therefor, the last field holds a name to an element of the collection. Enter a name here, like e in the given example, and then click the OK-Button. The resulting diagram is displayed in fig. 4.5.2.
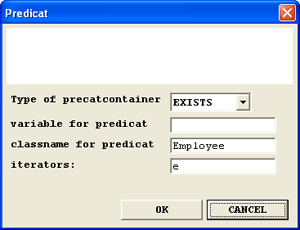 |
Fig. 4.5.1 - Dialog for creation of a Predicate Container
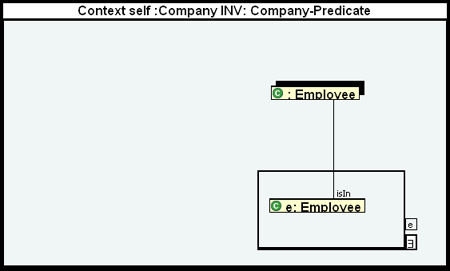 |
Fig. 4.5.2 - The resulting Predicate Container
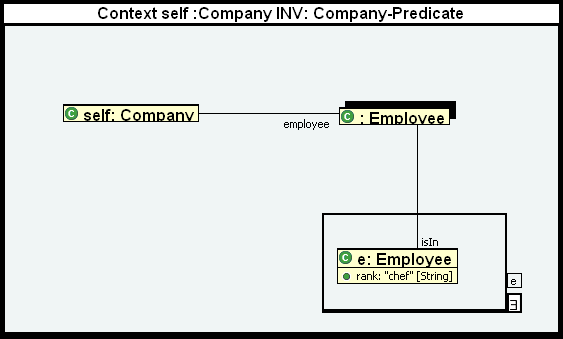 |
Fig. 4.5.3 - Complete Diagram with Predicate Container
 |
Fig. 4.5.4 - The resulting OCL-String
b) The IsIn-Association
In the upper example, a new type of association was introduced, the IsIn-Association. This association indicates, that a classifier is part of a collection classifier, and can only be used in combination with the predicate container and the associated collection classifier. Having a predicate container created, one association of this type already exists, but it neither have to be the only one, nor it can't be deleted. Try to delete and recreate the IsIn-Association by first selecting it, then clicking the delete key, and then choosing the IsIn-Association-Button and connect the collection classifier with the iteration classifier.
c) Resizing and Moving
The predicate container can be resized and moved as any other figure of this editor. Selecting the figure is a little tricky, because you do not have to click inside of it, but beside. To select it, choose the select-button and click into the space, which is on the right side of the predicate container, for example inside the box, which holds the quantification type. Now, the complete figure is selected and can be resized and moved by dragging the mouse around as usual.
d) A more complex example
Finally a more sophisticated example is presented. The predicate container can hold
every other type of expression inside, even other container types like boolean or
if-then-else expressions. They are added the same way like adding them to normal
expressions. Select the desired one from the Button menu, and click inside the predicate
container. The result is, that the new expression type is now inside the predicate
container, and all elements, which were part of the predicate container, like the iteration
classifier with its IsIn-Association where cloned and placed into all new sub-containers
of the new expression. To see an example, look at the resulting diagram in 4.5.5, which shows
the modified diagram of fig. 4.5.2, after adding an If-Then-Else expression.
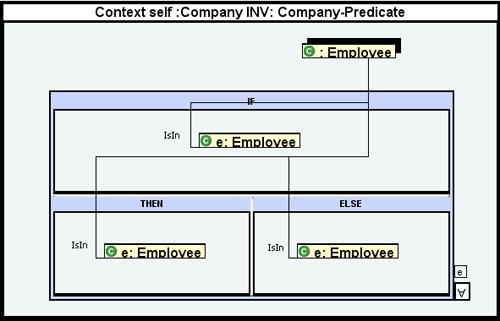 |
Fig. 4.5.5 - Modified diagram with If-Then-Else Expression
The following example also uses the predicate container in combination with the If-Then-Else expression. It is displayed in figure 4.5.6. The resulting OCL-String is shown in fig. 4.5.7. The creation should now not be difficult and is not explained. It easily can be created by extending the example from figure 4.5.3. All other used elements are explained so far, so that the reader should be able to add the rest himself.
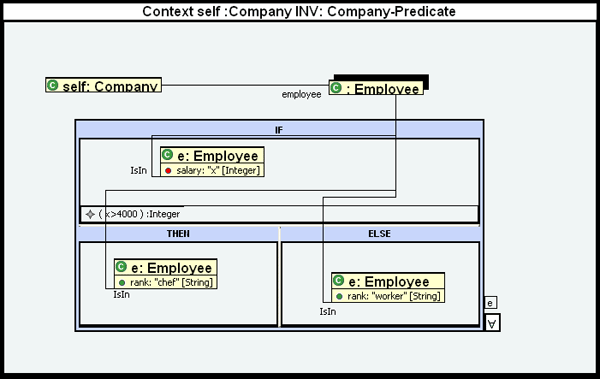 |
Fig. 4.5.6 - Complex diagram with If-Then-Else Expression
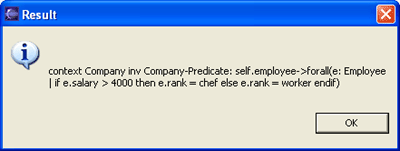 |
Fig. 4.5.7 - OCL-String of the expression
| section: < previous | next > | | | |
chapter: << previous | next >> |