
| section: < previous | next > | | | |
chapter: << previous | next >> |
3.1 Creating Constraints
As mentioned above, the top-level element of all vocl-diagrams is the constraint itself. Therefor the first step in creating a vocl diagram is to create a constraint-figure. To do this, just select the "Constraint"-Button (which then is displayed inverted), and click into the drawing area to a position, where the constraint-figure should be located (upper left corner of the figure). Then a dialog is presented, where some parameters can be specified (see fig. 3.1.1).
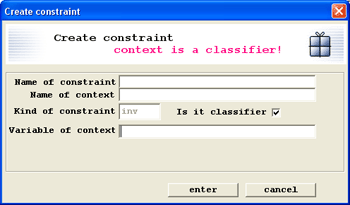 |
Fig. 3.1.1 - Dialog for creating a constraint
Depending on the type of constraint, the dialogs input differs slightly. The constraints are either an invariant, then the context refers to a classifier, or a pre- or post-condition, which sets the context to a class-method. Both cases are considered next.
a) Creating an invariant
When creating a constraint as invariant, the only thing to do is to fill out the textfields. The check-boxes default setting already selects an invariant type.- The name of the constraint is optional, but when using multiple constraints in one file, it is recommended to specify it. A name can be any text, but should not be too long, otherwise the figure, in which it is displayed, may not hold it in its full length. Enter for example Company-Constraint, indicating that this constraint refines a class diagram of a company-domain.
- The name of the context should refer to a class of a class-diagramm. Enter the correct name of the class, which behaviour should be refined by this constraint, for example Company, which should be a class of the domain mentioned above.
- The variable of the context is a reference name, by which the refined object is identified. Leaving it out will set the reference name by default on "self". Since a vocl-diagram can contain more than one object of the class defined in the context, this reference will point to the supposed object. Name it in this example simply c.
- Clicking the "enter"-Button will create the constraint inside the drawing area.
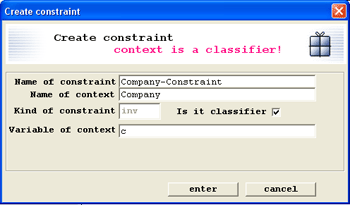 |
Fig. 3.1.2 - Example-constraint definition
 |
Fig. 3.1.3 - Example-constraint
b) Creating a pre- or post-condition
Creation of pre- and post-conditions is nearly the same, so that the example given only covers the first one. The only difference is that the defined Kind of the constraint is either pre, when defining a precondition, otherwise post for postcondition. All other input data is specified exactly the same way.- First unselect the check-box Is it classifier, which alters the dialog a little (see fig. 3.1.4). Instead of Variable of context, the textfield is labeled Type of method, and a new button appeared, named enter parameter. As shown next, the input data is also interpreted different.
- The name of the constraint has the same meaning when using invariants. Enter again Company-Constraint-2, indicating that this constraint belongs to the same domain as above.
- Here, the name of the context should refer to a class-method, not to a class. Enter the correct name of the class, in which the method is defined, then followed by a separator ::, and finally the method name. For example enter Company::getProfitPerYear. Parameters and type of the method are specified next.
- In a drop-down list, pre- or post-condition can be selected. Here, lets choose pre.
- The return-type of the method must be selected in the textfield named Type of method. Types are only distinguished by their string-value, so every basic type (Integer, Real, Boolean) or class type (Company) is possible. The examples method has the return type Integer.
- The methods parameters can be added by clicking the enter parameter-Button. A new dialog will appear (see fig. 3.1.5), which holds an empty list of parameters and button for add, edit and remove parameters from the list. Clicking the Add-Button will open another small dialog (see fig. 3.1.6), where name and type of the parameter can be entered. In our method we want to add only one parameter, the considered year, which should be given as integer-value.
- Applying the parameter, it will be overtaken to the list, and closing this dialog will store the edited parameters. They will become visible, when the constraint-figure is drawn inside the editor.
- Finally, clicking the "enter"-Button will create the constraint.
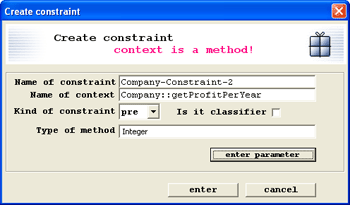 |
Fig. 3.1.4 - Dialog for creating a constraint
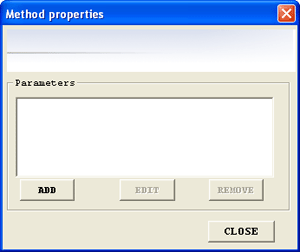 |
Fig. 3.1.5 - Dialog for adding parameters to method
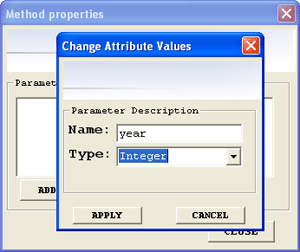 |
Fig. 3.1.6 - Dialog for creating a paremeter
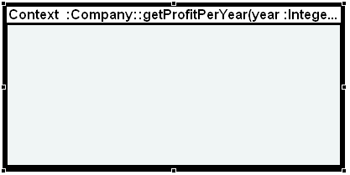 |
Fig. 3.1.7 - Resulting figure for a precondition-constraint
c) Conditions
Having the constraint-figure in place, a condition can be added at any time. They are primarily used to make further statements on variables, which are defined in objects or as return values of methods. How to create objects, attributes with variable values and methods is explained in the next chapter, so that conditions and meaningful examples are covered later, though they belong to the constraint-figure.
| section: < previous | next > | | | |
chapter: << previous | next >> |