
| section: < previous | next > | | | |
chapter: << previous | next >> |
3.4 Collection Classifiers
A collection classifier represents not only one object, but a set of instances of the same type. They are similar to normal classifiers, since they have a reference name, a type and attributes. The distinction is, that they do not have a method. Instead they have some special functions, which are resulting from their collection nature, e.g. a set size, corresponding to ocl.
a) Creating a collection classifier
Creating a collection classifier is almost the same like creating a single classifier. Therefor, carry out the following steps:- Select the "Collection-ClassifierRole"-Button and click inside the drawing area of a constraint-figure, which has to be in place before. A dialog appears, where the type and the reference name can be specified (fig. 3.4.1).
- The type (Classname) should denote a class from a class-diagramm, where the constraint belongs to. Enter for example Employee, to create a set of Employees.
- The reference name (Variablename) is a little ambigious. Having a collection but only one reference name, it is not clear, to which of the instances the reference name belongs to. The answer is it belongs to the complete set. Anyway, if the name has no relevance, leave it out, because its optional. This is done in the given example.
- By clicking the "Finish"-Button, the collection classifier is drawn into the constraint, visualized as a rectangle with a black shadow of itself in the background. It has at minimum a type inside (if no reference name was given). The green symbol "c" underlines, that this figure refers to a class (see fig. 3.4.2).
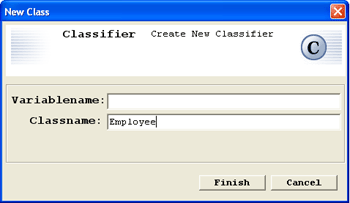 |
Fig. 3.4.1 - Dialog for creating a collection classifier
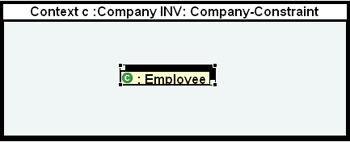 |
Fig. 3.4.2 - A collection classifier inside a constraint
b) Similarities with editing a classifier
Some of the possible editing tasks are similar to those explained in the last chapter, and therefor they are not discussed again. These are:- Moving the figure
- Changing the reference name (the entry of the context menu now is named Set Properties)
- Adding and Editing Attributes
c) Set Funcions
Set functions are special operations, that can be applied only to collections, not to single instances (or it makes no sense to apply them on single instances). They are responsible to test the size of the set, check, if the set is empty or not, or summarize an attribute of all objects containing to that collection. These functions are discussed next.
c) i. Set Function: isEmpty
This function tests, if a collection classifier consists of an empty set. Adding it to the figure is quite simple.- Open the Set Properties-Dialog via the context menu (fig. 3.4.3). On the right side, all available settings for collections are made, the default setting is No Set-Operation.
- Change this by setting the radio-button on is Empty.
- Click the Close-Button, and see, how the figure has changed (fig 3.4.4)
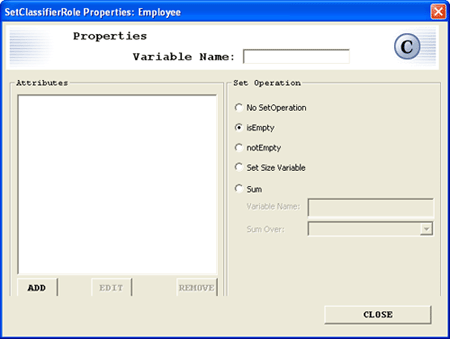 |
Fig. 3.4.3 - Set Proprties-Dialog
|
|
Fig. 3.4.4 - The collection classifier figure with set-function isEmpty
c) ii. Set Function: notEmpty
This function is the opposite of the latter one. When attaching it to the figure, simply choose notEmpty from the radio-buttons of the Set Proprties-Dialog instead. The resulting figure looks like displayed in fig. 3.4.5. The only difference is, that unequality is prefixed to the empty-set symbol.|
|
Fig. 3.4.5 - The collection classifier figure with set-function notEmpty
c) iii. Set Function: Set Size
This function is used to determine the size of a collection. The size is stored inside a new variable, which is of type Integer and can later be used to define conditions in the constraint. To add a set-size variable, follow these instructions:- First, open the Set Proprties-Dialog, as done before via the context-menu.
- Select the radio-button Set Size Variable. Now, one of the text-fields become active, labeled with Variable Name: (see fig. 3.4.6).
- There, enter the name of the new variable, for example s.
- Close the Dialog.
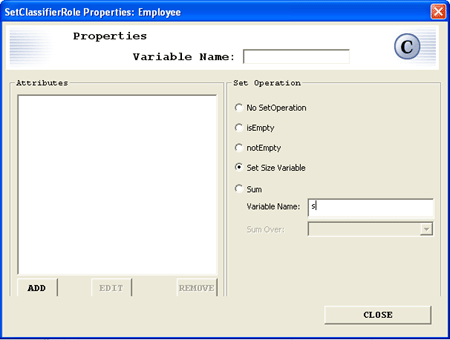 |
Fig. 3.4.6 - Set Proprties-Dialog for set-size
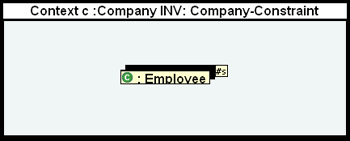 |
Fig. 3.4.7 - The collection classifier figure with set-function set-size
c) iv. Set Function: Set Sum
The next and last set function is also the most complex one in usage. Adding up an attribute of all items of the collection, it must refer to an existing attribute. The result of the sum is again stored in an new variable, and can also be used in conditions later. In this example, assume that an attribute of the class Employee is salary. The example given demonstrates, how to add up all salaries of the given employees, using a set size function:- First, open the Set Proprties-Dialog.
- Add an attribute called salary, which refers to variable called sal. The resulting figure is displayed in fig. 3.4.8. (Adding attributes is discussed in chapter 3.3)
- Select the radio-button Sum. Now, both text-fields are activated, the first with the (resulting) variable name, the second with the refenced attribute variable, which should be added up (Sum Over).
- Enter as variable name a new name of a variable, which should finally hold the result of the sum, e.g. total.
- Enter as sum over the name of the variable, which was used to refer to the attribute, here sal. As you can see, you can select the variable also from the drop-down list, but this will only work, if the attribute was already added, when opening the Set Proprties-Dialog (see fig. 3.4.9).
- Close the dialog.
The resulting figure now will look similar to the previous ones, but as set function symbol a sum operation is used, which iterates over the attribute-variable (sal) and stores the result to the new defined variable, here called total (see fig. 3.4.10).
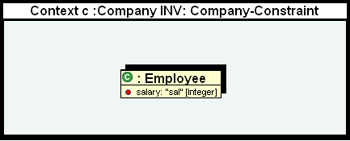 |
Fig. 3.4.8 - Collection classifier figure with attribute salary
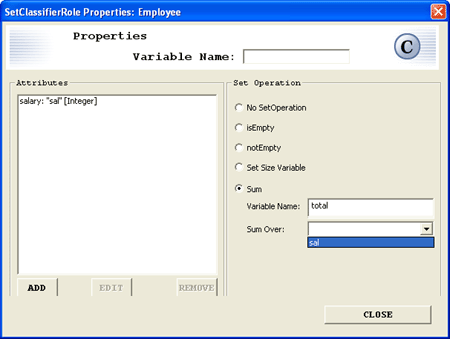 |
Fig. 3.4.9 - Dialog with selected sum
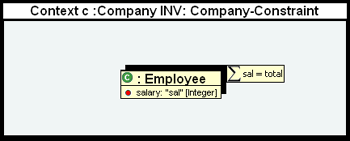 |
Fig. 3.4.10 - Collection classifier figure with defined set sum
| section: < previous | next > | | | |
chapter: << previous | next >> |