
| section: < previous | next > | | | |
chapter: << previous | next >> |
3.3 Classifiers
Since OCL, and therefor VOCL, refers to a class-diagram, classifiers are the most important modeling figure used here. They look almost the same like classes, but are meant to be instances. They have a type and a reference name.
a) Creating a classifier
Carry out the following steps to create a classifier:- Creating a classifier is done by selecting the "ClassifierRole"-Button and clicking inside the drawing area of a constraint-figure, which has to be in place before. The mouse pointer will turn into a circle with a diagonal line inside, when it is not possible to create a classifier at this location (e.g. outside of a constraint). Clicking with the left mouse-button into a valid location, a dialog appears, where the type and the reference name can be specified (fig. 3.3.1).
- The type (Classname) should denote a class from a class-diagramm, where the constraint belongs to. Enter for example Company.
- The reference name (Variablename) can be the same as in the constraint, if an invariant is used. If they are equal, the created object is the context of this constraint. If no context reference name is defined, or the context refers to a method, the context can be specified by naming the reference "self". In this example, the object is called c.
- By clicking the "Finish"-Button, the classifier is drawn into the constraint, visualized as a rectangle with at minimum a type inside (a reference name is optional). The green symbol "c" underlines, that this figure refers to a class (see fig.3.3.2).
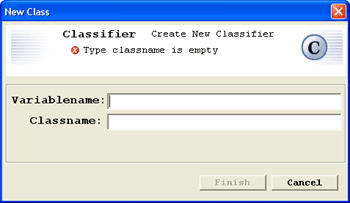 |
Fig. 3.3.1 - Dialog for creating a classifier
 |
Fig. 3.3.2 - A classifier inside a constraint
b) Moving
The classifier-figure can be moved in the same way as the constraint, though its location is limited to the drawing area of the constraint. Resizing is not possible. The size of this figure will automatically change by modifying the figure, as we will see now.
c) Editing with the Context-Menu
The reference name can be changed after creation, while the classname is fix (you have to delete and create a new, if there is something wrong). Changing the reference name is done via the centext-menu, which is opened when clicking the right mouse-button over the classifier figure (see fig. 3.3.3).
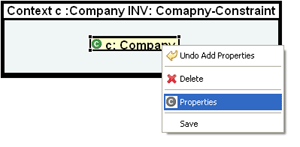 |
Fig. 3.3.3 - The context-menu of a classifier
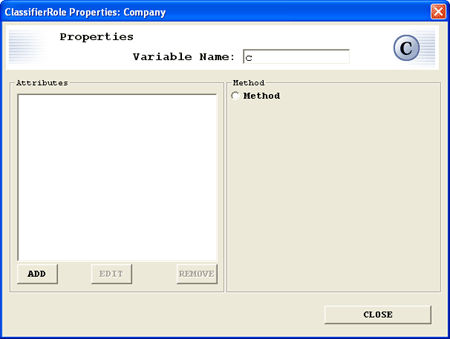 |
Fig. 3.3.4 - The Properties-dialog of a classifier
d) Adding Attributes
As you can see, the property-dialog of the classifier figure has some other fields not yet mentioned. The left side contains a list, where the attributes of this classifier are managed, the right side is used to add a method (only one method can be added per classifier).- Adding an attribute is done by clicking the Add-Button. A new dialog appears, in which the new attribute can be defined (fig. 3.3.5).
- Enter the attributes name, which can be an arbitrary string, for example name.
- The attributes value can be either a constant or refering to another variable (which later can be used in conditions, e.g. in the constraint). First assume we want to create a constant value, so let the check-box Is Value selected.
- The value then can be entered directly into the Value-Textfield. For example, a possible name of a company may be (and in fact is) general motors.
- Finally, the type of the attribute has to be defined. In our example, this is a string, which can be selected from the drop-down list, but an arbitrary type can be entered into the corresponding textfield.
- Clicking the Apply-Button will close that dialog, and the new attribute is overtaken into the list of attributes displayed in the Property-Dialog (see fig. 3.3.6). Closing this dialog will cause the classifier-figure to update itself with the edited attributes (see fig. 3.3.7).
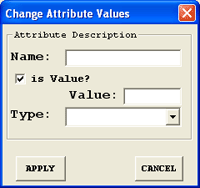 |
Fig. 3.3.5 - Defining an attribute of a classifier
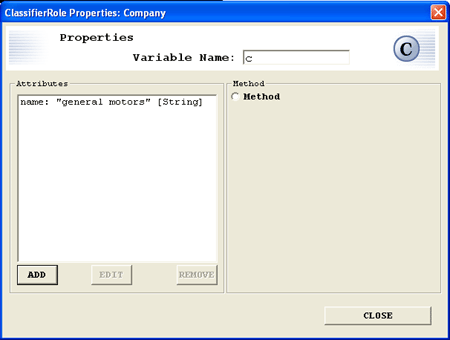 |
Fig. 3.3.6 - Property-dialog with an attribute
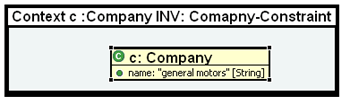 |
Fig. 3.3.7 - Classifier-figure with an attribute
- Open again the Property-Dialog and click the Add-Button, so that the dialog for adding attributes appears.
- Enter the attributes name, for example profitPerYear.
- Unselect the check-box is Value. The label of the Value-Textfield alters to Variable.
- Here, enter the name of a variable, e.g. x.
- Define the type of the attribute (and of the variable). In our example the profit is an Integer.
- Clicking again the Apply-Button and close the Property-Dialog. The new attribute is displayed within the classifier-figure (see fig. 3.3.8).
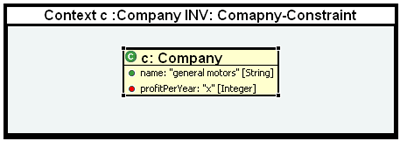 |
Fig. 3.3.8 - Classifier-figure with two attributes
Note, that the attributes both are dispayed with a small circle prefixed. The color indicates, if the attributes value is constant (green) or variable (red).
e) Editing Attributes
Editing the Attributes is also done via the Property-Dialog. The buttons Edit and Remove become active, when an attribute is selected. Clicking the Edit-Button will open the dialog shown in fig. 3.3.5, with the only difference, that the actual values are shown in the textfields. These can be adapted and by clicking "Apply" again, the new values are overtaken.
Clicking the "Remove"-Button will delete the attribute from the list. When closing the dialog, all changes are committed and the figure updates as before.
f) Adding a Method
To form constraints on methods, these have to be added to classifiers as well. The visualisation only allows one method to be added to a classifier-figure at any time. Methods are not only used within invariants, they can also have pre- and post-conditions, which have to be declared in the constraint. To add a method, open again the Property-Dialog of a classifier-figure, and follow these steps:- Check the radio-button inside the method area, and all necessary editing fields will become visible (see fig. 3.3.9).
- In the first textfield specify the name of the method, for example getProfitPerYear. Note, that here the method-name from the context of the constraint has to be inserted, if the pre- or post-condition should match here.
- Then, if a method returns a value, a name of a variable should entered to the next textfield, which stores the result, and can be later compared in conditions. Here, the result is stored in a variable called res.
- Now, the type of the method, and implicitly the type of the defined variable, has to be set. In this example its the base-type Integer.
- Next, a list is shown, where all paramters of the method are displayed. To add a parameter, click the Add-Button, and a small dialog, already known from the constraint-creation with a method-context, appears. Enter a name and a type, and apply the parameter, which then is shown in the parameter-list of the property-dialog. In our example, the parameter was called year and is an Integer.
- Closing the Property-Dialog will update the classifier-figure with its newly defined method (see fig. 3.3.10).
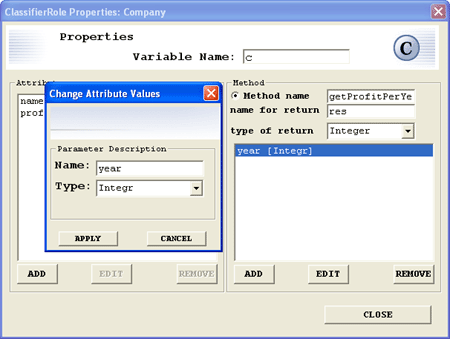 |
Fig. 3.3.9 - Property-dialog with method selected
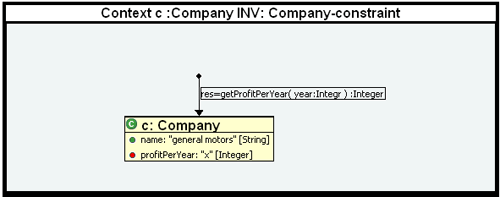 |
Fig. 3.3.10 - Classifier-figure with a method
| section: < previous | next > | | | |
chapter: << previous | next >> |