
| section: < previous | next > | | | |
chapter: << previous | next >> |
2.4. Editor-Panel setup
Before explaining the functionality, lets have a closer look on the components of the editor panel, which you can see in detail in figure 2.4.1. Generally, the editor is splitted into two parts, one on the left-hand side, where some buttons are grouped among each other, and the editors drawing area on the right-hand side (marked with a 5). The buttons are again grouped by their different functions. The two buttons marked with (1), i.e. "Select" and "Marquee", change the mouse mode. With "Select" enabled, a figure can be selected and moved on the drawing area. "Marquee" is used to select a group of figures, which then can be moved or deleted together. The "Constraint"-button (2) is used to create a constraint-figure, the top-level item of each VOCL diagram, where all other elements are nested inside. Of course, there can be more than one constraint on a drawing area. The next group of buttons (3) holds the figures for all expressions, which have some sub-expressions inside. In some way, they can be regarded as container for other expressions. For example, the "IfThenElse Expression" is a container for three sub-expressions, as we will see later. The last group (4) consists of buttons for simple figures, like classifiers and associations.
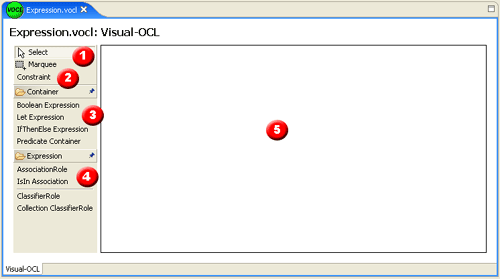 |
Fig. 2.4.1 - The VOCL-Editor
| section: < previous | next > | | | |
chapter: << previous | next >> |